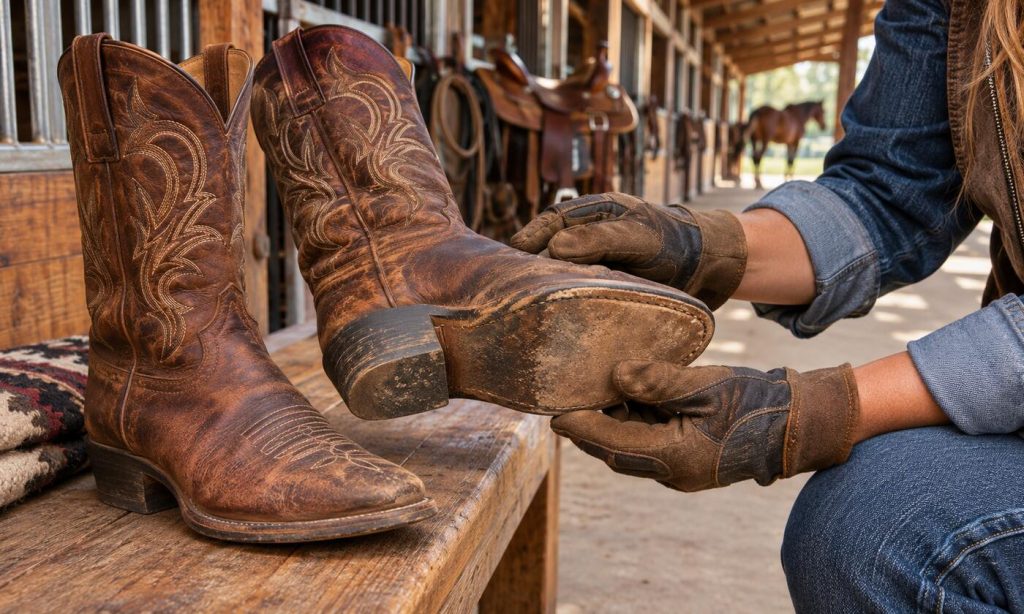
Western riding boots can look serviceable long after their most important parts have worn down. The decisive question is not how old they are. It is whether the heel, sole, upper, and fit still let you walk, mount, and leave the stirrup safely. If you are wondering when to replace western boots for riding horses, begin with an inspection before your next ride. Wear that feels minor on the barn floor can become serious when your foot is in a stirrup.
The useful lifespan of western boots for riding horses depends on construction, riding hours, conditions, and care. A pair used daily in wet footing faces different stresses than occasional arena boots. You can often repair surface wear, but some damage changes how a boot supports your foot. This guide explains what to inspect, when repairs make sense, and which signs should stop a ride.
Look for safety-critical wear before counting years
A defined riding heel helps keep a foot from sliding too far through a properly sized stirrup. Inspect both heel blocks from the side and below. Look for severe unevenness, missing sections, loose attachment, or a shape worn almost flat. The outsole deserves equal attention. A detached edge can snag; a loose layer may fold or catch when you mount or dismount. Don’t assume that a boot which feels comfortable walking is still suitable for riding. A quick inspection on the ground helps reveal these problems before you put weight in a stirrup. If a heel is unstable, stop riding in that pair until a qualified repairer evaluates it.
Check the toe shape and tread against the actual stirrup you use. The boot should slide out smoothly, without binding on a broad or heavily textured sole. The stirrup must have adequate clearance around the foot. Wear can change that relationship over time. The practical answer to when to replace western boots for riding horses is therefore based on function, not a fixed month or mileage limit. A severely damaged heel, separating outsole, or boot that catches in a stirrup needs immediate attention. Do not wait for the next seasonal cleaning to discover a safety problem.
Examine the leather, seams, and inner structure
Flex the boot gently with your hands and study the bend at the ball of the foot. Fine surface creases are normal in leather. Deep cracks that open through the material, exposed lining, broken stitching, or holes near stress points are different. They may allow water inside and worsen under repeated movement. Examine the welt, the seam around the sole, and the shaft’s pull tabs. Loose stitching can sometimes be repaired, but an upper that has split across a load-bearing area may be past sensible restoration. Watch for sharp edges that could irritate your ankle or catch clothing while mounting.
Inspect the inside with a light. Feel for hard ridges, a collapsed insole, damp padding, and rough heel seams. Smell can indicate retained moisture, but odor alone does not prove that a pair is unsafe. The more reliable clues are structural weakness, persistent moisture damage, and pain or slipping that no longer improves with sensible care. For a practical cleaning and inspection sequence, see how to clean and inspect cowboy boots for wear. It can help you distinguish ordinary dirt from a developing defect. Keep both boots together during this check; left and right often wear differently.
Check fit again as your boots age
Riding boots should hold the instep securely without crushing the toes. Some heel movement in new pull-on boots can be normal, but progressively excessive lift, foot sliding, or a loose shaft deserves closer attention. Leather stretches and foot shape can change. Socks also affect fit. Test the pair while wearing your usual riding socks, then walk, bend, and practice moving your foot in and out of a stirrup without mounting. If your toes curl to hold the boot on, or your foot slides forward under light pressure, the fit may no longer be appropriate.
Pain matters even when the outside looks sound. Repeated rubbing, numbness, pressure over the instep, or new blisters point to a mismatch between foot and boot. Inspect for a damaged lining before assuming the leather needs stretching. The separate guide to checking cowboy boots for pressure points and riding fit gives a fuller fitting routine. If fit cannot be restored without changing the boot’s safe relationship to the stirrup, replacement is more sensible than improvising. FYI, thicker socks are not a cure for a heel that has become dangerously loose.
Decide between a repair and complete replacement
Some defects are repairable by a competent boot repair professional. A worn heel cap, localized stitching failure, or outsole at the end of its service life may be a reasonable repair candidate. The professional should assess the whole boot, not just the most visible damage. Ask whether the replacement sole and heel will keep an appropriate riding profile and allow clean stirrup release. A repair that improves appearance but changes the sole into an aggressive, bulky tread can create another problem. Never glue a separating riding heel as a quick fix and assume that it is secure enough for the saddle.
Replacement is more likely when multiple structural parts have failed, the upper is extensively cracked, or the footbed has become unstable. It may also be the better choice when the repair cost approaches that of a sound replacement and the remaining material is weak. The important question is whether the repaired boot will reliably perform its riding job. An experienced repairer can assess materials and construction, but you are responsible for testing fit before riding again. For broader context, what to wear riding horses discusses how boots fit into a complete riding outfit.
Build an inspection routine around your actual use
After each ride, remove loose dirt and allow damp boots to dry at room temperature. Avoid putting them against a heater, which can damage some materials. Use care products only when compatible with the boot material and the maker’s instructions. Before the next ride, scan the heel, outsole edge, shaft, and stitching. Once a month, perform a closer inspection that includes the lining and insole. Frequent riders or people working in wet environments may need to inspect more often. A routine matters because wear usually develops gradually, not in one dramatic moment.
Keep a brief note if you have already repaired a heel or sole. Repeated failures at the same spot may indicate a fit or construction problem. Compare the two boots and watch for an unusually uneven heel, which may also reflect your walking pattern. Do not base replacement decisions on whether leather looks fashionable or rugged. IMO, a plain boot that passes a careful safety check beats a handsome pair with a questionable heel. If your stirrup size or saddle changes, recheck boot clearance rather than assuming yesterday’s fit still works. Safety depends on the whole setup.
Frequently Asked Questions
Replacing western boots is a judgment about structural condition, secure fit, and stirrup compatibility. The answers below address common situations without relying on an arbitrary replacement deadline. Inspect both boots carefully whenever the ride feels different.
These quick checks are useful alongside professional assessment for borderline damage. If a boot is clearly unstable, do not use it while deciding what to do. A visual inspection cannot guarantee safety, but it can flag obvious reasons to stop.
How many years do western riding boots usually last?
There is no universal lifespan. Daily use, ground conditions, leather quality, care, and construction all matter. Inspect for damage and fit changes rather than replacing boots on a fixed calendar schedule.
Can a cobbler replace a worn riding heel?
Often, yes, if the boot structure remains sound. Explain that the boots are used for horseback riding. Confirm that the restored heel and sole remain appropriate for your stirrup before riding.
Are smooth soles safer than heavy tread?
A sole should release cleanly from the stirrup. Deep, bulky tread can increase the chance of catching, depending on the equipment. Evaluate the actual boot-stirrup combination rather than judging tread in isolation.
Should I ride with a small crack in the leather?
A superficial finish crease differs from a deep structural crack. If the leather opens, the stitching loosens, or support changes, pause riding and seek a professional assessment.
What if only one boot is worn out?
Inspect both, including heel height, fit, and sole profile. A repairer may be able to fix one. If replacing a pair, make sure the two boots provide consistent support and release.
Final Words
The best answer to when to replace western boots for riding horses is simple: replace or professionally repair them when safety-critical structure or fit fails. Focus on loose heels, separating soles, deep cracks, altered fit, and anything that could catch inside a stirrup. Ordinary scuffs alone rarely tell the full story. Recheck the boots after repairs, with your own stirrups, before returning to a normal ride.
Good maintenance extends useful life, but it cannot rescue every damaged pair. If you are assessing western boots for riding horses, treat riding safety as the first requirement, then consider comfort and appearance. Keep the detailed boot-wear inspection guide nearby for your next routine check.